
Watering
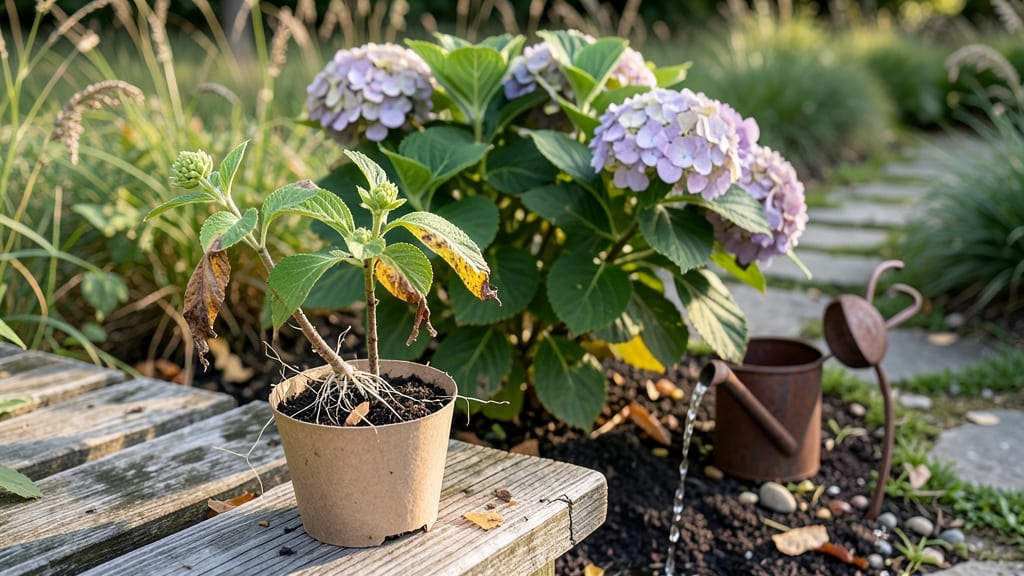
Hydrangeas dying after planting is usually a root problem—not a death sentence. 💚 I’ve nursed back more wilted hydrangeas than I’d like to admit, and the fix almost always starts with checking what’s happening below the soil line.
Most gardeners overlook the subtle clues that point to transplant shock, poor drainage, or hidden root damage.
The first step is simple: dig gently around the base to inspect the roots. Healthy roots should be white or light tan, while mushy or black roots mean rot from overwatering.
Yellowing leaves? That’s often a sign of underwatering or compacted soil. I’ve saved plants just by loosening the soil and adding compost—no fancy tools needed.
Once you identify the issue, the revival process is straightforward. For root rot, trim the affected roots and repot in fresh, well-draining soil. If it’s dryness, water deeply once a week (not daily) and mulch to keep moisture steady.
Within 4-6 weeks, you’ll see new growth pushing through—proof the plant is coming back to life.
Prevention is easier than fixing: plant in spring or fall, avoid soggy soil, and water consistently but not excessively. These tricks have kept my hydrangeas thriving for years, even in tough conditions. Let’s get those roots back in action!
Root Shock and Plant Trauma
When your hydrangeas look sad after planting, the culprit is often root shock—a stress response that happens when roots are disturbed during transplanting. Even if the plant looks healthy above ground, the roots may be struggling silently below. Here’s why it happens and how to fix it:
Hydrangeas have delicate root systems that are easily bruised when dug up and replanted. When roots are severed or crushed—even slightly—the plant loses its ability to absorb water and nutrients efficiently. This disruption triggers a stress response, causing wilting, yellowing leaves, or even death if severe.
Science behind it: Roots release ethylene gas when damaged, signaling the plant to slow growth and conserve energy. Meanwhile, the disrupted root zone struggles to re-establish contact with the soil, leading to dehydration.
Pro tip: Always water the plant thoroughly 1–2 days before transplanting to reduce root stress. This keeps roots supple and less prone to breaking.
While hydrangeas love moisture, soggy soil after planting can drown roots before they recover. If the planting hole retains too much water (common in clay or compacted soil), roots suffocate from lack of oxygen. This is especially risky if the plant was already stressed from transplanting.
Science behind it: Roots respire aerobically—they need oxygen to function. Waterlogged soil forces roots into anaerobic (oxygen-deprived) conditions, producing toxic byproducts like ethanol, which poison the plant.
Actionable fix:
- Amend heavy soil with perlite or compost to improve drainage.
- Avoid watering for 3–5 days post-planting unless the soil is bone-dry.
- Test drainage by filling the hole with water—if it doesn’t drain within 30 minutes, add more organic matter.
Hydrangeas planted during heatwaves or extreme cold suffer shock because their roots can’t regulate temperature quickly. If the soil is too hot (e.g., >90°F/32°C) or too cold (below 50°F/10°C), root activity slows or stops, halting nutrient uptake.
Science behind it: Roots rely on mycorrhizal fungi (beneficial soil microbes) to help absorb water. Cold or heat stress weakens these partnerships, leaving the plant vulnerable to dehydration.
Pro tip:
- Plant in early spring or fall when temps are mild (50–75°F/10–24°C).
- Use mulch (2–3 inches) to insulate roots and retain moisture.
- Avoid planting in full afternoon sun during summer—opt for dappled shade.
Hydrangeas are pH-sensitive, and sudden changes in soil acidity (pH <5.5) or alkalinity (pH >6.5) can shock their roots. If the new soil’s pH is drastically different from the nursery pot, the plant struggles to adapt, leading to nutrient deficiencies or toxicity.
Science behind it: Hydrangeas need iron and manganese for chlorophyll production. In alkaline soil, these nutrients become unavailable, causing yellowing leaves (chlorosis) and stunted growth.
Quick test: Use a soil pH test kit ($5–$10). For acid-loving hydrangeas, amend soil with sulfur or pine needles to lower pH gradually.
Key takeaway: Root shock is rarely just one thing—it’s usually a combo of physical damage + environmental stress. The good news? With the right care, hydrangeas bounce back faster than you think. Next up: How to nurse them back to health!
Revive Your Hydrangeas Fast
If your hydrangeas are struggling after planting, don’t panic! With the right care, you can nurse them back to health and set them up for vibrant blooms. Below are practical, step-by-step fixes tailored to the most common causes—plus prevention tips to keep your plants thriving long-term.
Signs: Yellowing leaves, mushy stems, or a foul smell around the soil.
How to Fix It:
- 🔥 Stop Watering Immediately – Let the soil dry out slightly before watering again.
- 🍳 Check the Soil – Dig a small hole (2-3 inches deep) near the plant. If it’s soggy after 24 hours, drainage is the issue.
- ⏰ Improve Drainage – Mix compost or perlite into the soil to loosen it up. If planting in a pot, ensure it has drainage holes.
- 👨🍳 Repot if Needed – If the roots are rotting, transplant to fresh, well-draining soil.
Prevention Tip: 💡 Water deeply but less often—hydrangeas prefer 1-1.5 inches of water per week, but they hate soggy roots!
Signs: Wilting, crispy leaf edges, or soil pulling away from the pot.
How to Fix It:
- 🥘 Water Thoroughly – Soak the soil until water drains from the bottom (for pots) or seeps into the ground (for in-ground plants).
- 🌡️ Provide Shade – Move potted hydrangeas to a shadier spot or use a light shade cloth if they’re in full sun.
- 🎯 Mulch to Retain Moisture – Apply 2-3 inches of mulch (like wood chips or straw) around the base to lock in moisture.
- ✨ Mist Leaves (Temporarily) – Lightly misting can help reduce transpiration while roots recover.
Prevention Tip: 🔥 Morning watering is best—it gives roots time to absorb moisture before the heat of the day.
Signs: Slow growth, pale leaves, or blue/purple stems (indicating phosphorus deficiency).
How to Fix It:
- 📊 Test Your Soil – Use a DIY soil test kit (available at garden centers) to check pH and nutrient levels.
- 💪 Amend the Soil –
- For acidic-loving hydrangeas (blue/pink blooms): Add sulfur or peat moss to lower pH.
- For neutral soil (white/green blooms): Mix in lime or wood ash to raise pH.
- 🍎 Fertilize Gently – Use a balanced, slow-release fertilizer (like 10-10-10) once in early spring and again after blooming.
Prevention Tip: 🌡️ Hydrangeas love slightly acidic soil (pH 5.5-6.2)—test annually to keep them happy!
Signs: Chewed leaves, sticky residue (aphids), or black spots (fungus).
How to Fix It:
- 🔪 Identify the Problem –
- Aphids/Spider Mites? Spray with neem oil or insecticidal soap.
- Fungal Spots? Remove affected leaves and treat with copper fungicide.
- 👨🍳 Prune Damaged Areas – Cut off black or mushy stems with clean shears.
- 🌡️ Improve Airflow – Space plants apart to reduce humidity (which fuels fungus).
Prevention Tip: ✨ Inspect new plants before bringing them home—quarantine them for a few days to catch pests early!
Signs: Drooping, yellowing, or sudden wilting after transplanting.
How to Fix It:
- 🥘 Water Deeply After Planting – Roots need immediate hydration to recover.
- 🌡️ Shield from Wind/Sun – Use a light shade cloth for the first 1-2 weeks.
- 🎯 Avoid Fertilizing Yet – Wait 4-6 weeks before feeding—roots need to establish first.
Prevention Tip: 💡 Plant in early spring or fall (not summer heat or winter frost) for the best survival rate!
✅ Stop watering if overdone → Let soil dry slightly. ✅ Water deeply if underwatered → But don’t drown them. ✅ Test soil pH → Adjust with amendments if needed. ✅ Check for pests/disease → Treat early before it spreads. ✅ Give them time → Hydrangeas can take 2-3 weeks to bounce back!
With these fixes, your hydrangeas should perk up within 2-4 weeks. 🌸 Happy gardening!
Frequently asked questions
Why do hydrangea leaves turn brown and crispy after planting?
This usually means your hydrangea is underwatered or suffering from transplant shock. Check the soil—if it's bone-dry 2 inches below the surface, water deeply until it drains from the bottom (for pots) or seeps into the ground. For the first 2 weeks after planting, keep soil consistently moist but never soggy.
How long should I wait before fertilizing a struggling hydrangea?
Wait 4-6 weeks after planting before adding fertilizer. Freshly transplanted hydrangeas need time to establish roots—feeding too soon can burn delicate roots still recovering from shock. Start with a balanced, slow-release fertilizer (like 10-10-10) in early spring instead.
Can I save a hydrangea with mushy stems and foul-smelling soil?
Yes, but act fast! This is root rot from overwatering. Stop watering immediately, then trim all mushy stems with clean shears. Repot in fresh, well-draining soil mixed with perlite or compost. Place in a shadier spot and water only when the top 1 inch of soil feels dry. Recovery takes 3-4 weeks if caught early.
Why do my hydrangea's leaves look yellow but the veins stay green?
This classic sign means your hydrangea is iron-deficient (chlorosis), often caused by alkaline soil (pH >7.0). Test your soil—if pH is high, amend with sulfur or peat moss to acidify it gradually. For quick results, use an iron chelate fertilizer every 4-6 weeks during growing season.
Is it better to plant hydrangeas in spring or fall?
Both work, but early spring (March-April) is ideal for most climates. Fall planting (September-October) gives roots time to establish before winter, but avoid planting when temps drop below 50°F (10°C). Never plant in summer heat—roots can't recover from transplant shock in extreme conditions.