
Aphids
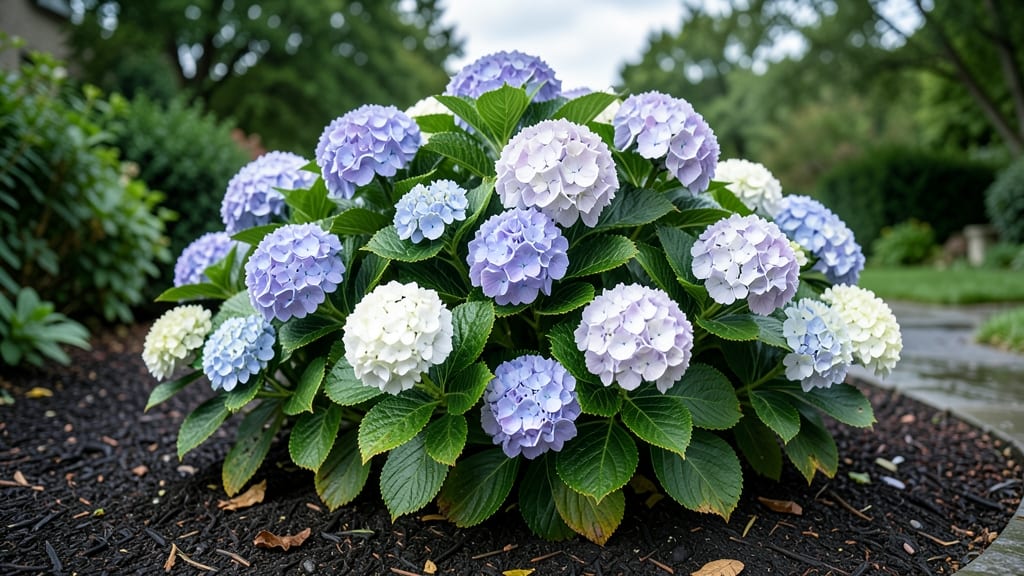
My beautiful picotee hydrangea steals every summer show with its dramatic blue-violet blooms and crisp white edges—like nature's own watercolor masterpiece. ✨ The moment I planted this one, my garden transformed from ordinary to showstopper, with blooms that last from June until frost.
What makes them special isn't just the color, but how they change with the light—morning sun deepens the blues, while afternoon shade brings out subtle lavender hints.
These hydrangeas thrive as standalone statement plants in cottage gardens or formal borders, but they also play beautifully with companions. Pair them with lavender for a Mediterranean vibe, roses for classic romance, or hostas for lush contrast.
I love using them as a focal point near patios or entryways where their height (4-6 feet) creates instant drama. The secret to their magic? Planting them where they get morning sun and afternoon shade—this keeps their colors vibrant all season.
What you'll get is a garden that feels like a living painting, with blooms that shift from soft lavender to rich purple as the season progresses. The petals even have a delicate papery texture that catches the light beautifully.
Once established, they're low-maintenance—just prune in late winter to encourage fresh growth, and watch them reward you with months of effortless beauty.
Perfect for beginner-friendly garden designs or experienced gardeners looking to elevate their space. Whether you're creating a romantic cottage garden or a modern minimalist border, picotee hydrangeas bring unmatched elegance that's impossible to ignore. Let's make your garden the envy of the neighborhood!
📚 In This Guide
- What you need
- Instructions
- Tips and common mistakes
- Wrapping up and next steps
What you need
- ● Picotee hydrangea plant: 1 nursery-grown Hydrangea macrophylla (preferably 'Nikko Blue' or 'Endless Summer' varieties for best picotee blooms).
- ● Well-draining potting mix: 5 gallons of a peat-based or coco coir blend (pH 5.5–6.5 for optimal blue-violet blooms).
- ● Container or garden bed: For containers: 1–2 15–20 gallon pots with drainage holes.
- ● For garden beds: A sunny, partially shaded spot with at least 3–5 feet of space for mature growth.
- ● Slow-release fertilizer: 1 cup of balanced 10-10-10 or acid-loving plant fertilizer (like Miracle-Gro Azalea/Camellia).
- ● Mulch: 2–3 inches of pine bark or shredded leaves to retain moisture and acidify soil.
- ● Watering can or hose: With a gentle spray nozzle to avoid damaging blooms.
- ● Pruning shears: Bypass pruners (sterilized with rubbing alcohol) for shaping.
- ● pH test kit: To monitor soil acidity (aim for 5.0–5.5 for blue blooms).
- ● Support stake: 1 6-foot bamboo or metal stake if planting in windy areas.
- ● Gloves: Garden-grade to protect hands from thorns.
Step-by-step guide to cultivating a thriving picotee hydrangea
Here's how to coax those stunning blue-violet blooms into full, vibrant life—season after season.
🌱 Step 1: Select the Perfect Planting Site
Picotee hydrangeas demand partial shade—think morning sun with afternoon shade—to prevent scorched blooms. I always look for spots with dappled sunlight where leaves get filtered light, like under tall trees with open canopies. Avoid deep shade; your plant will produce fewer blooms if it doesn't get at least 4-6 hours of indirect light daily.
Test your site in early spring before planting. If the ground stays dry for days after rain, you'll need to amend the soil with organic matter to improve moisture retention. A simple scratch test—digging down 6 inches and checking for compacted layers—tells me if I need to loosen the soil before planting. Never plant in full sun; the edges of those signature picotee blooms will bleach out within weeks.
✂️ Step 2: Plant at the Right Depth and Stake for Support
Dig a hole twice as wide as the root ball but only as deep as the container's root base—picotee hydrangeas hate being buried too deep. Gently remove the plant, tease the roots outward if they're circling, and place it so the top of the root ball sits level with the surrounding soil. I always tap the sides of the hole lightly to eliminate air pockets before setting the plant in.
Stake immediately with 2-3 stakes (not just one) to prevent flopping. Drive them 3-4 inches deep around the plant, then tie the main stems loosely with soft garden twine—tight enough to support but loose enough to allow growth. Water deeply right after planting to settle the soil and eliminate air gaps around the roots. You'll know it's done correctly when water drains away within 10-15 minutes—no standing pools.
💧 Step 3: Water Deeply and Mulch for Moisture Retention
Water deeply every 2-3 days during the first growing season, aiming for 1-1.5 gallons per week unless you're in extreme heat. The key is consistent moisture—hydrangeas hate drying out completely between waterings. I check by sticking my finger 2 inches into the soil; if it feels dry, it's time to water. Overhead watering can cause fungal issues, so use a soaker hose or water at the base.
Spread 2-3 inches of mulch (like shredded bark) around the base, keeping it 3 inches away from the stem to prevent rot. This mimics the forest floor where hydrangeas naturally thrive. Mulch helps regulate soil temperature and reduces evaporation, which is especially critical in hot summer months. Replenish mulch annually in early spring—it breaks down faster than you'd expect.
☀️ Step 4: Prune Strategically for Maximum Blooms
Picotee hydrangeas bloom on old wood, so pruning is all about shaping—not cutting back hard. Wait until late winter or early spring (just as buds begin to swell) to trim. Remove dead or crossing branches first, then lightly shape the plant by cutting back only the oldest stems by about one-third. Never prune in fall; you'll sacrifice next year's blooms.
Here's the trick: Look for fat, woody stems—these are last year's growth and won't produce flowers. Thin these out to encourage new growth. For leggy stems, cut back to a bud or side branch. Avoid heavy pruning; your goal is to maintain the plant's natural shape while encouraging strong, healthy new growth from the base. You'll see new shoots emerging within 4-6 weeks of proper pruning.
🌿 Step 5: Feed and Monitor for Seasonal Care
Fertilize in early spring with a balanced, slow-release fertilizer (10-10-10) to support new growth. I sprinkle ½ cup around the drip line (not the base) and water it in. Avoid high-nitrogen fertilizers—they promote leafy growth at the expense of blooms. In mid-summer, switch to a low-nitrogen, high-phosphorus fertilizer (like 5-10-10) to encourage flowering for next season.
Watch for yellowing leaves—this usually means overwatering or nutrient deficiency. If leaves are yellow with green veins, it's likely iron deficiency; apply chelated iron according to package instructions. For powdery mildew (common in humid climates), spray with a baking soda solution (1 tablespoon baking soda + 1 quart water + a drop of dish soap) every 7-10 days until the issue clears. With proper care, your picotee hydrangea will reward you with vibrant blooms from mid-summer through fall.
Tips & tricks for cultivating stunning picotee hydrangeas
Here's what nobody tells you about keeping these showstopping blooms thriving year after year.
Lighting Secret: That "partial shade" isn't just about avoiding full sun—it's about creating the perfect dappled light environment. I've found that using a sheer white curtain on the sunny side of your patio or deck creates an instant ideal microclimate for picotee hydrangeas during their first critical growing season. The key is mimicking their natural forest floor habitat where sunlight filters through tree canopies. If you're planting in containers, position them where they'll receive morning sun but afternoon shade from nearby structures.
Planting Depth Technique: The "level with surrounding soil" rule is non-negotiable, but here's the trick I learned after burying three plants too deep: When removing your hydrangea from its container, look for the natural soil line where the plant grew in its nursery pot. That's your reference point—not the top of the root ball. Also, if your soil is particularly heavy clay, consider adding a handful of perlite to the bottom of the planting hole to improve drainage while maintaining that perfect planting depth.
Watering Wisdom: The 2-3 day watering schedule works beautifully in moderate climates, but here's what I do in summer heat: I increase my watering to every other day and add a layer of hydro-mulch (a slow-release water gel) to the soil surface. This creates a moisture reservoir that keeps roots hydrated for up to 7 days. The secret is applying it after your regular watering—it absorbs the moisture and releases it gradually. Just be sure to keep it 3 inches away from the stem to prevent rot.
Pruning Breakthrough: When pruning those oldest stems in late winter, I've discovered a simple trick to identify which stems to cut: Look for stems that are thicker than your thumb—these are the old wood stems that won't bloom. The thinner stems (about the width of your pinky) are this year's growth and will produce flowers. This visual cue makes pruning much less intimidating, especially for beginners. And remember, those 4-6 weeks for new growth to appear? That's when you'll see little red buds forming—your reward for proper pruning!
Pro Tips for My Beautiful Picotee Hydrangea
- Here's what nobody tells you about keeping these showstopping blooms thriving year after year.
- Lighting Secret: That "partial shade" isn't just about avoiding full sun—it's about creating the perfect dappled light environment.
- That's your reference point—not the top of the root ball.
Frequently asked questions
Got questions about your stunning Picotee Hydrangea? You’re not alone!
Here are answers to the most common queries—from care tips to troubleshooting—so you can keep those dreamy blue-violet blooms thriving all season.
How do I keep my Picotee Hydrangea blooms blue instead of pink?
The color of your Picotee Hydrangea depends on soil pH! For blue blooms, aim for acidic soil (pH 5.5–6.0). Test your soil with a kit, then amend with sulfur or peat moss if needed. Avoid lime or compost with high calcium, which can shift colors to pink. Pro tip: Feed with an acid-loving plant fertilizer (like Miracle-Gro Azalea) every 4–6 weeks for consistent color.
When is the best time to prune my Picotee Hydrangea?
Prune your Picotee Hydrangea right after flowering (late summer to early fall) to avoid cutting off next year’s buds. If it’s overgrown, trim back 1/3 of the oldest stems to encourage new growth. Never prune in early spring—this plant blooms on old wood, so late pruning preserves its stunning display.
Why are my hydrangea leaves yellowing or curling?
Yellowing or curling leaves often signal aphids, mites, or nutrient deficiencies. Check the undersides of leaves for pests—spray with neem oil or insecticidal soap if you spot them. Overwatering or poor drainage can also cause stress. Ensure your plant gets well-draining soil and water only when the top 1–2 inches of soil are dry.
Can I grow Picotee Hydrangeas in containers?
Picotee Hydrangeas thrive in containers if you choose a large pot (at least 15–20 gallons) with drainage holes. Use acidic potting mix and repot every 2–3 years. Place in partial shade (morning sun, afternoon shade) and water consistently—containers dry out faster. Bonus: Move pots to a sheltered spot in winter if temps drop below 10°F.
What’s the best companion plant for Picotee Hydrangeas?
Pair your Picotee Hydrangea with shade-tolerant, moisture-loving plants like hostas, ferns, or astilbes for a lush garden bed. Avoid competitive plants (e.g., boxwoods) that may steal nutrients. For a pop of color, try heucheras (coral bells) or bleeding hearts—they complement the hydrangea’s delicate blooms beautifully!
Wrapping up and next steps
Your my beautiful picotee hydrangea is more than just a stunning addition to your garden—it’s a symbol of patience, care, and natural beauty. With the right knowledge about aphid control, pruning, and soil care, you can keep those show-stopping blue-violet blooms thriving for years to come. 🌸
Now that you’re armed with tips and tricks, why not share your progress? Snap a photo of your hydrangea’s transformation and tag us—we’d love to see your garden glow! For even more inspiration, explore seasonal care guides or join gardening communities to swap stories with fellow plant lovers.