
Container Gardens
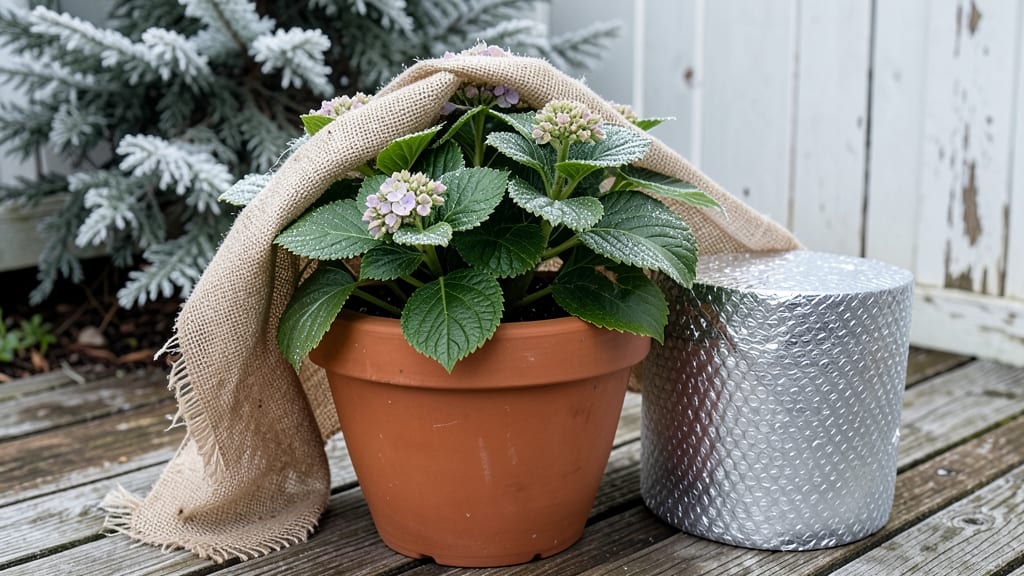
Wintering hydrangeas in pots can mean the difference between a thriving plant and a sad, frozen mess next spring. 🌿 I’ve lost count of how many potted hydrangeas I’ve nursed back from winter damage—until I finally cracked the code on insulation, watering, and shelter. The key?
Treating them like delicate houseguests during the cold months. Most people make one critical mistake: leaving pots exposed to freezing temps without protection. Hydrangeas in containers are especially vulnerable because their roots freeze faster than in-ground plants.
But with the right prep—like wrapping pots in bubble wrap, moving them to sheltered spots, and adjusting water—you’ll wake up to lush foliage and buds ready to bloom in spring. My mophead hydrangeas now survive winters in Zone 5 without a single brown leaf.
The payoff is worth the effort: vibrant blooms that outshine neighbors’ summer-only plants. You’ll spot new growth by April, and the plant’s energy will focus on flowering instead of recovering from frost damage. Just watch for signs of stress—wilting or mushy stems mean it’s time to adjust your shelter.
This method works for any potted hydrangea, from dwarf varieties to large shrubs. Let’s get those roots protected before the first hard frost hits!
📚 In This Guide
- What you need
- Instructions
- Tips and common mistakes
- Wrapping up and next steps
What you need
- ● Potted hydrangeas: Ensure pots have drainage holes (if not, add them!). Choose containers at least 12-18 inches wide for mature plants.
- ● Insulating materials: Bubble wrap or frost cloth (enough to wrap the entire pot, 2-3 layers for extra protection).
- ● Insulating foam sleeves (cut to fit pot diameter).
- ● Mulch: Straw, shredded leaves, or pine needles (3-4 inches thick around the base of the plant).
- ● Pot feet or liftable trays: Elevate pots 2-3 inches off the ground to prevent freezing.
- ● Waterproof container: For collecting excess water (e.g., a shallow tray or bucket).
- ● Garden twine or bungee cords: To secure insulation tightly.
- ● Heating mat or self-watering pot: For regions with extreme cold (below 10°F/-12°C).
- ● Plant labels: To track varieties and winter care notes.
- ● Anti-desiccant spray: (e.g., Wilt-Pruf) to protect leaves from drying out.
- ● Thermometer: A soil or air thermometer to monitor temperatures.
Step-by-Step instructions for wintering hydrangeas in pots
Here's how I've kept my potted hydrangeas thriving through winter—no frost damage, no wilting, just next spring's blooms waiting in the wings.
🪴 Step 1: Choose the Right Containers and Drainage
Start with pots that have drainage holes—hydrangeas hate soggy roots, and winter moisture lingers longer than you'd think. I use insulated grow bags (like those for winter squash) because they trap warmth while allowing airflow. If you're repotting, upgrade to a container 2-3 inches larger than last year's—this gives roots room to adjust without drying out.
Fill the pot with high-quality potting mix (not garden soil) mixed with 20% perlite or vermiculite for aeration. Tap the container gently to settle the soil, then water until it's evenly moist but not soggy. The goal is to mimic the plant's natural moisture balance—too dry and roots freeze; too wet and they rot. You'll see the perfect moisture level when the soil feels like a damp sponge.
🌿 Step 2: Prune and Prepare Hydrangeas for Dormancy
Prune after the first hard frost (usually late fall) when the plant has entered dormancy. Cut back one-third of the oldest stems to encourage new growth next season. For mophead and lacecap hydrangeas, remove dead or damaged branches first—these are the weak spots that freeze first. I avoid heavy pruning in early fall because new growth won't harden off before winter.
Reduce watering gradually over 2-3 weeks before the first frost. Let the top 2 inches of soil dry out between waterings—this signals the plant to slow down. You'll know you've timed it right when the leaves start turning brown and crisping naturally. Never let the soil stay bone-dry, though; hydrangeas need consistent moisture even in dormancy to survive winter.
☀️ Step 3: Insulate and Protect from Frost
Move pots to a north-facing wall or sheltered spot where they're protected from north and west winds—these are the coldest exposures. Wrap the pot in bubble wrap or frost cloth, leaving the top open for airflow. For extra insulation, place the pot inside a larger container (like a wooden box) filled with straw or leaves, leaving 2 inches of space around the sides. This creates a microclimate that keeps roots 10-15°F warmer than ambient temperatures.
If you're in a Zone 5 or colder, add a layer of mulch (like straw or shredded leaves) 3-4 inches thick over the soil surface. This prevents frost heave (when soil freezes and lifts the pot) and keeps roots insulated. Check the mulch monthly—if it compacts or gets soggy, fluff it up to maintain airflow. You'll see the mulch doing its job when the soil beneath stays above 20°F even during deep freezes.
⏰ Step 4: Monitor and Adjust Through Winter
Check your hydrangeas every 2-3 weeks during winter, even if it's cold. Look for ice crystals on the soil surface—this means moisture is escaping, and the roots are drying out. If the soil feels dry to the touch, water lightly with lukewarm water (never cold). I use a watering can with a long spout to avoid disturbing the mulch. The key is to keep the soil barely moist, not soggy.
If temperatures drop below 10°F, add an extra layer of insulation—like a tarpaulin draped over the pot (secured with bricks or stakes). Avoid plastic directly on the plant, as it can trap too much moisture and cause rot. You'll know your insulation is working if the stems stay flexible (not brittle) and the leaves remain attached but dry. Brittle stems or blackened leaves mean it's time to adjust your protection.
🌱 Step 5: Transition Back to Growth in Early Spring
As soon as daytime temperatures consistently stay above 40°F, remove the insulation and mulch. Gradually increase watering over 2 weeks, letting the soil dry slightly between waterings. This wakes up the roots without shocking them. You'll see the first sign of life when buds swell—this is your cue to start fertilizing lightly with a balanced 10-10-10 formula (half-strength).
Move the pot to a sheltered spot (like a patio or garage) for 1-2 weeks before placing it outdoors. This hardens off the new growth and prevents sunburn. Watch for new leaves—these are your signal that the plant is ready for full sun. If you notice yellowing leaves, it's usually a sign of overwatering or nutrient deficiency, so adjust accordingly. With these steps, your hydrangeas will bloom earlier and more abundantly than ever before.
Tips & tricks for frost-proofing potted hydrangeas
Wintering hydrangeas in pots isn't just about survival—it's about setting them up for a spectacular spring comeback. Here's what I've learned after years of trial and error with my own collection.
Container Selection Matters: When choosing your insulated grow bags or containers, pay special attention to the thickness of the material. Thicker insulation (at least 1/4-inch) maintains that crucial 10-15°F warmer microclimate we're aiming for during extreme cold snaps. I've found that double-walled grow bags with reflective inner layers work particularly well—they bounce heat back toward the roots. If you're using traditional pots, consider adding an extra layer of bubble wrap around the outside before insulating, as this creates an additional barrier against temperature fluctuations.
Soil Moisture Balance: The evenly moist but not soggy soil guideline in Step 1 is your golden rule, but achieving it takes practice. I've developed a simple test: squeeze a handful of soil—if water drips out immediately, it's too wet. If it crumbles completely, it's too dry. The perfect consistency should hold its shape when squeezed but still feel cool to the touch. This balance is especially critical during winter when evaporation slows down, making it easy to overwater without realizing it. A moisture meter specifically designed for potted plants can be a worthwhile investment for precise monitoring.
Pruning Precision: That one-third of the oldest stems guideline in Step 2 is non-negotiable for mophead and lacecap varieties, but timing is everything. I've learned to wait until after the first hard frost when the plant has clearly entered dormancy—you'll notice the leaves have turned brown and crisped naturally. Cutting too early can stimulate new growth that won't harden off properly before winter. For oakleaf hydrangeas, you can be slightly more aggressive with pruning since they bloom on old wood but still new growth, so time it carefully to avoid sacrificing next year's flowers.
Insulation Layering: The 3-4 inches of mulch recommendation is perfect for Zone 5 and colder climates, but don't be afraid to go thicker if you're experiencing particularly harsh winters. I've used up to 6 inches in extreme cases, especially when temperatures are forecasted to drop below -10°F. For additional protection, place a layer of cardboard or foam board between the pot and its outer insulation container—this creates an air gap that significantly improves insulation performance. The key is to maintain that above 20°F root zone temperature while still allowing some airflow to prevent moisture buildup.
Pro Tips for Wintering Hydrangeas In Pots
- Wintering hydrangeas in pots isn't just about survival—it's about setting them up for a spectacular spring comeback.
- Container Selection Matters: When choosing your insulated grow bags or containers, pay special attention to the thickness of the material.
- Soil Moisture Balance: The evenly moist but not soggy soil guideline in Step 1 is your golden rule, but achieving it takes practice.
Frequently asked questions
Got questions about keeping your potted hydrangeas thriving through winter? You’re not alone! Here are answers to the most common concerns—so you can relax and enjoy your blooms year-round.
Can I leave my hydrangea in a pot outside all winter without extra protection?
Generally, no—unless you live in a Zone 8 or higher with mild winters. Pots freeze faster than in-ground plants, and roots can suffer. For most climates, move pots to a sheltered spot (like a garage or porch) or wrap them in burlap or frost blankets for insulation. If left outside, bury the pot in mulch or straw up to the rim to shield roots from freezing temps.
When is the best time to winterize potted hydrangeas?
Start prepping 4–6 weeks before your first frost (usually late fall). Prune dead blooms, reduce watering, and move pots to a shady, protected area. Once temps drop below 32°F (0°C), add insulation. If storing indoors, wait until after the ground freezes (typically late November–December in most zones) to avoid shocking the roots.
What if my hydrangea’s leaves turn brown or crispy during winter?
Brown leaves are normal for dormant hydrangeas—they’re conserving energy! However, if leaves mushy or rot, overwatering is likely. Reduce watering to once every 2–3 weeks (or less if stored indoors). For evergreen varieties (like oakleaf hydrangeas), protect them with burlap wraps to prevent windburn. If branches snap, prune them back in early spring.
Can I store potted hydrangeas indoors over winter?
Yes! If you’re storing them indoors, place pots in a cool (40–50°F / 4–10°C), bright spot (like a garage or basement with natural light). Avoid heat sources (like furnaces) to prevent root rot. Water sparingly (every 4–6 weeks) and check for pests like spider mites. Replant outdoors after the last frost in spring.
What’s the easiest way to protect hydrangeas in pots if I can’t move them?
If relocating isn’t an option, bury the pot in straw, leaves, or mulch up to the rim to insulate roots. Wrap the pot and plant in bubble wrap or frost cloth, securing it tightly. For extra defense, place a cardboard box around the pot and fill the gaps with newspaper or shredded paper. This creates a mini greenhouse effect to trap heat.
Pro Tip:
Label your pots before winter! Hydrangeas can look identical when dormant, and mums vs. panicle vs. oakleaf all need slightly different care. A quick note saves headaches in spring when it’s time to fertilize or prune.
Wrapping up and next steps
Wintering your potted hydrangeas doesn’t have to be stressful—with the right prep, you’ll keep those lush blooms thriving year after year! 🌿❄️ The key is protection, patience, and a little TLC to shield roots from frost while letting leaves breathe.
Whether you’re wrapping pots, insulating with mulch, or moving them indoors, consistency is your best friend.
Ready to tackle next year’s garden? Start now by gathering supplies (like frost cloth and bubble wrap) and marking your calendar for early fall prep. Your future blooms will thank you! 🌸