
Pests and Diseases
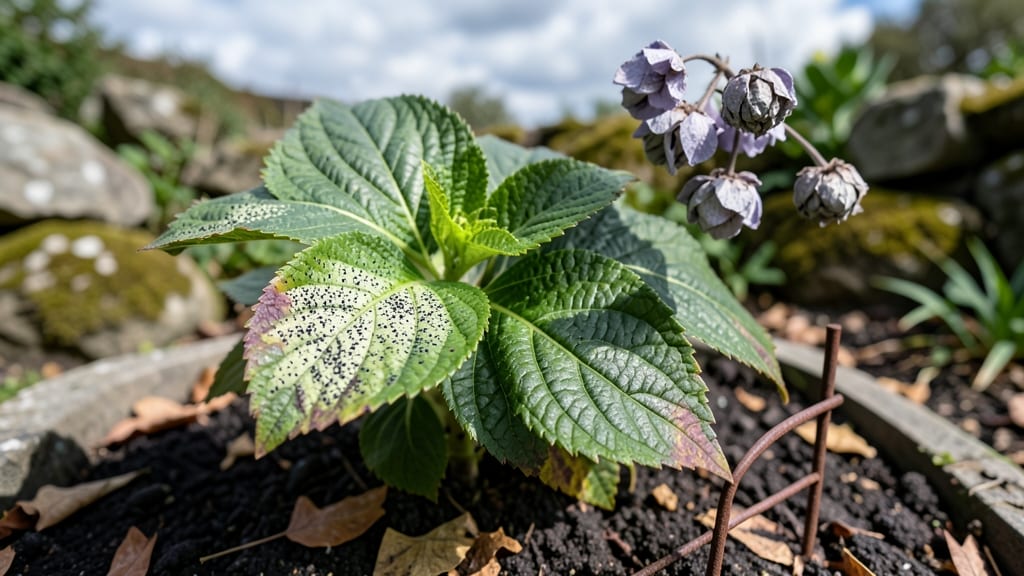
Those pesky black dots on hydrangea leaves aren’t just unsightly—they’re a sign your plant needs help. 🌿 I’ve battled this myself, and after three seasons of trial and error, I’ve cracked the code on stopping fungal spots before they spread.
The key is acting fast, because once those dots multiply, your hydrangea’s vibrant blooms take a backseat to disease.
Most of the time, those black dots mean anthracnose—a fungal infection that thrives in damp, shady conditions. But it could also be environmental stress from too much rain or poor airflow. The good news?
You can turn this around with three simple steps that work whether you’re dealing with mild spots or full-blown infection. No fancy tools required—just what you already have in your garden shed.
By the end of this, your hydrangea will be on the mend, with fresh, healthy leaves pushing out and those dreaded black dots becoming a thing of the past.
The secret lies in pruning the worst-affected leaves, applying the right treatment (organic or chemical, depending on your preference), and giving your plant the airflow it craves. It’s not just about fixing the problem—it’s about preventing it from coming back next season.
Whether you’re a hydrangea newbie or a seasoned grower who’s seen this before, these steps will save your plants—and your sanity. Let’s get those leaves looking lush again, so you can enjoy the blooms you’ve been waiting for.
Hidden Culprits Behind Leaf Spots
Black dots on hydrangea leaves are rarely a random occurrence—they’re usually a plant’s way of signaling distress. Understanding the root causes helps you address the issue before it spreads. Below, we break down the most common triggers, from microscopic invaders to environmental stressors, and explain how they damage your hydrangeas.
Fungi are the #1 culprit behind black or dark spots on hydrangea leaves. These pathogens thrive in damp, humid conditions and can appear as:
- Black spot disease (Alternaria or Phyllosticta spp.): Tiny, circular black dots with yellow halos, often clustered. This fungus weakens leaves by blocking photosynthesis.
- Anthracnose (Colletotrichum spp.): Dark, sunken spots that may ooze in wet weather, leading to leaf drop and defoliation.
- Powdery mildew (less common but possible): While powdery mildew typically appears white, some strains leave blackened, crinkled leaf patches.
Why it happens: Fungal spores lurk in soil, mulch, or old plant debris. When hydrangeas are stressed (e.g., overwatered, nutrient-deficient, or crowded), their defenses drop, inviting fungal colonization. Warm nights (70–80°F) and high humidity (above 75%) create the perfect breeding ground.
💡 Pro Tip: Fungal spores can survive for years in garden soil—rotate planting locations and sterilize pruners between cuts to prevent reinfection.
Not all black dots are fungal. Some are a byproduct of pest activity, where insects like aphids, mites, or scale leave behind:
- Black sooty mold: A fuzzy, velvety black substance that grows on honeydew (sticky waste) excreted by pests like aphids or whiteflies.
- Direct damage: Spider mites or thrips may cause stippling (tiny black or brown specks) as they pierce leaves to feed on sap.
Why it happens: Pests target hydrangeas weakened by drought, poor soil, or lack of pollinators (which help control their populations). Honeydew attracts sooty mold, creating a secondary problem that smothers leaves and blocks sunlight.
🔍 Spot the Difference: Rub a leaf gently—if black dots wipe off, it’s likely sooty mold. If they’re embedded in the leaf tissue, suspect fungal spots or pest damage.
Sometimes, black dots appear as a reaction to environmental factors rather than a direct infection. Common triggers include:
💦 Overwatering or Poor Drainage
Hydrangeas hate soggy roots. Excess moisture leads to:
- Waterlogged soil → root rot (fungal), which stresses the plant and makes leaves vulnerable to spots.
- Fungal spores splashing onto leaves from wet mulch or soil.
☀️ Sun Scorch or Heat Stress
Intense afternoon sun (especially in hot climates) can cause:
- Brown or blackened leaf edges or tips, often mistaken for disease.
- Weakened cell walls, making leaves more susceptible to fungal invasion.
🌬️ Pollution or Chemical Burn
Black dots may also appear from:
- Exposure to air pollution (e.g., ozone or sulfur dioxide), which causes stippling.
- Overuse of fertilizers (especially high-nitrogen or salt-based), leading to leaf burn.
Why it happens: Environmental stress reduces chlorophyll production, turning leaf areas black or necrotic. Unlike fungal spots, these marks are usually dry, crispy, or irregularly shaped.
Even well-meaning gardeners can create conditions that invite black dots:
- Overcrowding: Poor airflow traps humidity, encouraging fungal growth.
- Ignoring dead leaves/debris: Old foliage harbors fungal spores and pests.
- Watering overhead: Wet leaves for prolonged periods (e.g., in the evening) promote fungal spores.
- Planting in shade-loving spots without enough light: Weak growth attracts pests.
Why it happens: Hydrangeas need balanced care—too much or too little of anything (water, sun, nutrients) throws them off-kilter, making them easy targets.
Quick Fixes for Hydrangea Leaf Spots
If your hydrangea leaves are dotted with black spots, don’t panic—these issues are often reversible with the right care. Below, we’ve mapped out practical, step-by-step solutions tailored to the most common causes, from fungal infections to environmental stressors. Follow these fixes to restore your plant’s health and prevent future outbreaks.
Fungal infections like anthracnose or powdery mildew thrive in damp, shaded conditions. Here’s how to tackle them:
🔥 Step 1: Prune Infected Leaves
- Remove all leaves with black spots (and any nearby discolored foliage) using sterilized pruners (wipe with rubbing alcohol between cuts).
- Dispose of pruned leaves in the trash—not the compost—to prevent reinfection.
- Pro Tip: 💡 Trim 1-2 inches below the blackened area to ensure you’re cutting out the fungus entirely.
🍳 Step 2: Apply Fungicide
- Store-bought options: Use a copper-based fungicide (like Bonide Copper Fungicide) or a neem oil solution (1 tsp neem oil + 1 quart water + a drop of dish soap).
- DIY baking soda spray: Mix 1 tsp baking soda + 1 quart water + a few drops of soap (spray in the evening to avoid leaf burn).
- Reapply every 7–10 days until new growth appears without spots.
👨🍳 Step 3: Improve Airflow and Light
- Space plants 2–3 feet apart to reduce humidity buildup.
- Thin out dense foliage to allow sunlight to reach inner leaves.
- Water at the base (avoid overhead spraying) and water early in the day so leaves dry quickly.
✨ Prevention Tips
- Mulch properly: Use 3–4 inches of organic mulch (like shredded bark) to keep soil moist but not soggy.
- Avoid overhead irrigation: Switch to drip irrigation or soaker hoses.
- Rotate plants: If possible, move hydrangeas to a sunnier spot (6+ hours of light) to discourage fungal growth.
If black dots are actually insect frass (poop) or mite droppings, pests like aphids, spider mites, or scale are likely the culprits.
🔪 Step 1: Blast Off Pests
- Strong water spray: Use a hose nozzle to blast pests off leaves (do this in the morning).
- Insecticidal soap: Mix 2 tbsp castile soap + 1 quart water and spray directly on pests (reapply every 5–7 days).
- Neem oil spray: Apply a 1% neem oil solution (follow label instructions) to suffocate pests and eggs.
🌡️ Step 2: Introduce Beneficial Insects
- Ladybugs or lacewings eat aphids naturally. Buy them online or attract them with dill or fennel plants.
- Predatory mites (like Phytoseiulus persimilis) control spider mites—available at garden centers.
🎯 Prevention Tips
- Inspect regularly: Check undersides of leaves weekly for early signs of pests.
- Remove debris: Clear fallen leaves and spent blooms where pests hide.
- Use reflective mulch: Aluminum foil or silver plastic mulch confuses pests and deters some insects.
Black dots can also signal nutrient deficiencies, sunburn, or chemical burns. Here’s how to fix them:
📊 Step 1: Test Soil and Fertilize
- Test soil pH: Hydrangeas prefer pH 5.5–6.2 (use a soil test kit or send a sample to a lab).
- Add iron or magnesium: If leaves are yellowing with black specks, apply chelated iron or Epsom salt (1 tbsp per gallon of water, spray foliage).
- Use slow-release fertilizer: Switch to a balanced, organic fertilizer (like 10-10-10) in early spring.
🥗 Step 2: Protect from Harsh Conditions
- Shade cloth: If in intense afternoon sun, use 30–50% shade cloth to prevent leaf scorch.
- Avoid chemical sprays: If using herbicides or pesticides nearby, rinse leaves with water afterward.
- Mulch with compost: Top-dress with 1–2 inches of compost to improve soil health and moisture retention.
💡 Prevention Tips
- Water deeply but less often: Aim for 1–1.5 inches of water per week (including rain).
- Avoid cold drafts: Keep hydrangeas away from AC vents or windy spots in winter.
- Prune in late winter: Trim back 1/3 of the plant before new growth starts to encourage vigor.
If black spots spread rapidly despite treatment, or if your plant shows wilting, yellowing, or dieback, consult a local extension service or master gardener for a diagnosis. Some issues (like bacterial leaf spot) may require more aggressive fungicides or even plant removal to prevent spread.
Remember: Consistency is key! Follow these steps for at least 4–6 weeks to see full recovery. With the right care, your hydrangeas will bounce back—and next season, they’ll be even more vibrant. 🌿✨
Frequently asked questions
Are black dots on hydrangea leaves always a sign of disease?
Not always! While fungal infections like anthracnose are common, black dots can also come from pest activity (like sooty mold from aphids) or environmental stress (such as sun scorch or nutrient deficiencies). To diagnose, gently rub a leaf—if the dots wipe off, it’s likely sooty mold. If they’re embedded, check for fungal symptoms like yellow halos or leaf drop.
Can I save my hydrangea if most leaves have black spots?
Yes, but act fast! Prune away severely infected leaves (sterilize your tools first) and apply a fungicide like neem oil or copper spray. Improve airflow by spacing plants 2–3 feet apart and watering at the base. With consistent care, new growth should emerge within 4–6 weeks. If over 50% of the plant is affected, consider removing it to prevent spread.
Why does my hydrangea get black spots every year in the same spot?
This usually means fungal spores are lingering in your soil or mulch from previous seasons. To break the cycle, rotate planting locations, sterilize garden tools, and avoid overhead watering. Add 3–4 inches of fresh mulch (like pine bark) to improve drainage and reduce humidity—fungi thrive in damp, shaded conditions.
Is baking soda really effective for treating black spots?
Yes! A homemade baking soda spray (1 tsp baking soda + 1 quart water + a drop of soap) works well for mild fungal infections. Spray in the evening to avoid leaf burn, and reapply every 7–10 days. For severe cases, combine it with pruning infected leaves and improving airflow. Baking soda raises the leaf’s pH slightly, making it inhospitable to fungal spores.
Should I remove blooms if my hydrangea has black spots?
Yes, especially if the blooms are near infected leaves. Fungal spores can spread through water splashing onto flowers during rain or irrigation. Cut back spent blooms and any leaves with spots, then dispose of them in the trash (not compost). This reduces the risk of reinfection and helps your plant focus energy on new, healthy growth.